
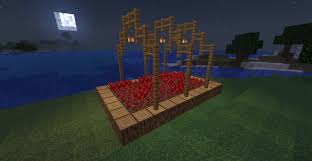
Well, farms and houses are some of the really common forms of structures in Minecraft. But nether wart farms aren’t that common there. Nether warts are considered to be one of the essential items in the Minecraft gameplay, they are indeed an essential item for providing potions to the brewing process.
You might have seen or heard it from your friend or might have seen an awful nether wart farm on someone’s social media page. A nether wart farm is a real delight to watch, and along with it, a nether wart farm is really a beneficiary step in easing your life inside the Minecraft gameplay.
How to create a nether wart farm in Minecraft?
So, if you wish to add a nether wart farm to your gameplay in Minecraft then do follow this guide to the end.

In this article given below, we will be knowing the way of adding a nether wart farm to your gameplay in Minecraft by following some simple and interesting steps.
Well, you cannot easily add a nether wart farm to your gameplay by finding and collecting it from some place in the Minecraft world, as we are not talking about a single plant here, rather we are talking of a thousand number of plants that will grow and produce the nether wart from time, this same process will repeat similarly then on with the accent of time. And you will get an assured supply of the nether wart from then on.
Before we move to the actual process of creating the nether wart farm in Minecraft, let us consider the following editions of Minecraft that support the process of creating the nether wart farms inside the Minecraft.
It is certainly a good thing to know the editions that do support the process that you are going to follow. So that you don’t have to regret at the very end of the process knowing that the due process isn’t really supported by your respective edition.
The editions of Minecraft that do support the whole process of creating the nether wart farm in Minecraft are;
Java Edition
Pocket Edition
Xbox 360
Xbox One
PS3
PS4
Wii U
Nintendo Switch
Windows 10 Edition
Education Edition
So, these are the editions of Minecraft that support the process of adding the nether wart farm in Minecraft.
- Digging out the mud
The very first step of the process of creating the nether wart farm in Minecraft gameplay is to clear out or dig out the mud the area where you create a nether wart farm.
First of all, you need to select the area on your gameplay, where you want to create the nether wart farm in Minecraft.
After you have finalized the area, you need to dig out the mud from the surface of that area. You will need to follow different steps or processes for digging out the respective area on your editions.
- Follow the respective processes or steps in your device or edition of Minecraft to dig out the mud from the area that you have selected in the above steps.
Here, you have successfully dug out the mud from that area in Minecraft gameplay.
Now that you have cleared the surface for creating the nether wart farm in Minecraft, let us move to the actual process of creating the nether wart farm. How to create a nether wart farm in Minecraft?
Before we move to the actual process of creating the nether wart farm, let us also know the various kinds of stuff that we will need in the whole process.
The required items for creating the nether wart farm are;
- 40 soul sand
- 40 nether wart
So, you will be needing some 40 soul sand and some 40 nether wart for creating the nether wart farm in Minecraft.
- Placing the sand

Coming onto the actual process of creating the nether wart farm in Minecraft gameplay, the second step that we have here is placing the sands inside the dug out area.
You need to place the 40 sands altogether inside the area that you have cleared of mud.
So, you need to clear out the area that is exactly similar in size to the 40 sand blocks.
The process of adding the sand blocks inside the area does differ in the different editions of Minecraft.
That means you need to perform different steps in different editions of Minecraft to place the sand there.
The steps for placing the sand in different editions are;
Java Edition
You need to click on the right button of the mouse after selecting the soul sand from the bar, present on the bottom of the Minecraft screen.
Pocket Edition
For placing the soul sand on the area in the Pocket Edition, tap on the soul sand block after selecting it from the bar, present on the bottom the Minecraft screen.
Xbox 360 and Xbox One
For placing the soul sand inside the dug out area in Xbox 360 and Xbox One editions of Minecraft, you need to press the LT button on the controller after selecting the soul sand from the bar, present on the bottom of the screen.
PS3 and PS4
You need to press on the L2 button on your respective controllers in PS3 and PS4 after selecting the soul sand from the bar present on the bottom of the Minecraft screen.
Wii U
You need to press on the ZL button on your controller after selecting the soul sand from the bar present on the bottom of the Minecraft screen.
Nintendo Switch
For placing the soul sand inside the dugout area, click on the ZL button on your controller after selecting the soul sand from the below given bar on your Minecraft screen.
Windows 10 Edition and Education Edition
For placing the soul sand inside the dug out area in Windows 10 Edition and Education Edition, click on the right button of the noise after selecting the soul sand from the bar, present on the bottom of the screen.
So, these were the respective steps for placing the soul sand inside the area that you have dug out in the previous step.
There, you need to repeat the same for covering the whole area with the soul sand by placing the other soul sands inside the dug out area similarly.
After that you have filled the dug out area by the soul sand, it’s time to place the nether wart on the soul sand. We will be following this step in the next step.
- Placing the Nether wart

Now that you have placed the soul sand in the whole area, you need to place the nether wart on the soul sand.
The process of placing the nether wart on the soul sand block does differ from each edition of Minecraft.
The process of placing the nether wart farm on the soul sand are;
Java Edition
For placing the nether wart on the soul sand in Java Edition, you need to right click on the nether wart after selecting it from the bottom of the Minecraft screen.
Pocket Edition
You need to tap on the nether wart after selecting it from the below given bar on your Pocket Edition.
Xbox One and Xbox 360
For placing the nether wart on the soul sand in the Xbox One and Xbox 360 edition of Minecraft, you need to press the LT button on the respective controllers after selecting the nether wart from the bar, present on the bottom of the Minecraft screen.
PS3 and PS4
For placing the nether wart on the soul sand in the PS3 and PS4 edition of Minecraft, you need to press the L2 button on your respective controller after selecting the nether wart from the below given bar on the Minecraft screen.
Wii U
You need to press the ZL button on your respective controllers for placing the nether wart on the soul sand in Wii U edition of Minecraft, after selecting the nether wart from the below given bar on your Minecraft screen.
Nintendo Switch
For placing the nether wart on the soul sand in Nintendo switch edition of Minecraft, you need to press the ZL button on your controllers after selecting the nether warts from the below given bar on your Minecraft screen.
Windows 10 and Education Edition
You need to right click on the nether wart after selecting the nether wart from the bar, present on the bottom of the Minecraft screen.
So these were the respective processes for placing the nether wart on the soul sand in different editions of Minecraft.
Here, you have successfully placed the nether wart on the soul sand in your respective editions of Minecraft.
So we can say that you have almost created a nether wart farm in your Minecraft gameplay.
Thereafter, the nether wart will grow in size and produce a ripe nether wart that is ready to be cut. You can cut these nether warts and add them to your gameplay for future use.

- Cutting the nether wart
Now that you have successfully planted the nether wart on your respective area in Minecraft, your other step of the process would be to cut the fully grown nether wart in Minecraft.
The process of cutting the nether wart in the different editions of Minecraft does differ from every other edition.
The process of cutting the nether wart from your own nether wart farm in respective editions of Minecraft;
Java Edition
For cutting the fully grown nether wart in Java edition, click on the right button of the mouse while holding the nether wart by pointing at the nether wart.
Pocket Edition
For cutting down the nether wart from the nether wart farm in Pocket edition, tap on the respective nether wart while holding the nether wart by pointing at it on your screen.
Xbox One and Xbox 360
You need to press the RT button on your respective controller while holding the nether wart on your screen for cutting the nether wart in Xbox One and Xbox 360.
PS3 and PS4
For cutting the nether wart in the PS3 and PS4 editions of Minecraft, you need to press the R2 button on your respective controller while holding the nether wart on your screen.
Wii U
You need to press the ZR button on your respective Wii U controller for cutting the nether wart from the nether wart farm.
Nintendo Switch
For cutting the nether wart from your own nether wart farm in the Nintendo Switch edition of Minecraft, press the respective ZR button on your controller while holding the nether wart on your screen.
Windows 10 and Education Edition
For cutting down the nether wart from your own nether wart farm in the Windows 10 and Education Edition, you need to click on the left button of the mouse while holding the nether wart.
So these were the respective steps for cutting down the nether wart from your own grown nether wart farm in Minecraft.
Here, you have successfully created a nether wart farm that would produce the nether wart regularly in equal transitions.
You need to collect the nether wart that you have cut down from your own nether wart farm instantly, or it would disappear after sometime if you do not collect it.
There, you have to add the nether wart that you have cut from your own farm to the inventory, so that you can use it afterwards for planting or creating a new nether wart farm in your gameplay.
- Follow the respective step or gesture in your edition Minecraft to add the nether wart to your gameplay in Minecraft.
So in this way you can create a nether wart farm in your gameplay and cut down the grown up leaves for creating another nether wart farm.
Here, you successfully created the nether wart farm that would regularly supply you with nether warts that can be grown somewhere else.
So that was all about creating a nether wart farm in Minecraft.
Follow the links given below to get some more similar guides on various topics related to the process of adding or creating items and features in Minecraft.