
How to Make Custom Shields in Minecraft
You may use Minecraft banners to modify your shields if you’re seeking for a more creative way to do so. These banners are tall, distinctively decorated blocks with a shield that can be further customized with patterns and colors.
Minecraft Banners
Banners in Minecraft are mostly used to personalize your shield or as aesthetic elements. Place the banner on a shield in a 3×3 grid with the shield in the middle and the banner on the left side.
You can essentially enhance your shield by attaching the banner to it, granting it up to 10 absorption levels instead of 5. The shield’s knockback resistance against monsters and players is likewise increased by the banner.
How to Make Custom SHields in Minecraft
Banner designs for Minecraft
A Minecraft banner can have up to six different patterns on it. The pattern that was most recently created is usually the one on top. You can have up to 16 patterns on a single banner if you use commands.
You can use any color on the banner, but the pattern will usually cover it. In the Java edition of Minecraft, you can make patterns with a loom, however in the Bedrock edition, you can produce patterns with either a crafting table or a loom.
There are a plethora of Minecraft banners to choose from, including brickwork backdrops and ominous skull and crossbones designs. You may even combine two different designs to create your own custom banner design.
Using different dyes in varied quantities and placements on the banner, a variety of patterns can be readily generated. Some designs, like brickwork backdrops, are straightforward to make, while others demand a little of imagination How to Make Custom SHields in Minecraft.
The following are some of the most common designs:
- Fancy borders
- Brickwork patterns
- Brickwork background
- Skull and Crossbones
- Creeper face design
- Mojang logo
- Flower

Remember that you can make your own banners by mixing and matching any of the styles above, using different logos, colors, and borders.
Crafting Banners in Minecraft
So, what’s the best way to make a Minecraft banner? It’s actually fairly simple. However, considering the large variety of designs available, the process can appear intimidating at first.
Ingredients Required
- Stick
- Wool
One stick and six wools are required to make a Minecraft banner. Simply go to your crafting table screen and place the stick in the bottom middle slot, while the wool is placed in the top three and center three spaces.
Gathering Wool
Players will need to gather wool to make a flag. Sheep wool blocks can be gathered and coloured in any hue.
Finding wool can be difficult if a person is just starting out, depending on how frequently sheep spawn near their base. Sheep are a popular passive mob in Minecraft that can be found mostly in grassy biomes.
When a player discovers a sheep, they may want to construct a fence around it to keep it from wandering away and so that it can be used to farm wool. Players can use sheeps to harvest a single wool block after the sheep is secure.
Using numerous sheep speeds up the process while using only one requires the player to wait for the sheep to eat grass and regenerate their wool after each shearing.

Gathering Sticks
Sticks are one of the most prevalent elements in Minecraft, especially at the beginning. By destroying leaf blocks on trees, players can collect sticks.
Harvesting the tree trunk is one of the quickest ways to obtain a large number of sticks quickly. Any blocks left floating after the tree trunk has been removed will be destroyed over time, dropping sticks, saplings, and apples.
This is also a wonderful way to avoid suffering fall damage in survival mode, as well as a terrific way for players to quickly cut down several trees without having to break each individual leaf block.
Customizing Banners
Players can utilize a crafting table to build a banner after they have one stick and six wool blocks. If players do not already have a crafting table, they can make wooden planks out of three blocks of wood. After that, the wooden planks can be used to make a crafting table.
Banners can be crafted by placing the wool in the six top blocks on the crafting table and the stick on the center bottom block (shown above). Depending on the gameplay settings the player is using, the recipe may immediately appear in the player’s known recipe list once they gather the first block of wool.

The wool blocks can be dyed in any hue to personalize the banners during the creation process. This will change the color of the generated banner.
There are numerous patterns to choose from, allowing gamers to build a wide range of unique creations. Up to six different patterns can be applied to a single banner. Using console commands, this can be increased to sixteen.
Patterns may be generated on a loom in the Java Edition of Minecraft, whereas patterns can be created on both the loom and the crafting table in the Bedrock Edition. Two threads and two wooden planks can be used to make looms.
The loom has three slots: one for the banner, one for the dye, and one for the extra banner pattern. Optional pattern pieces can be made by combining a piece of paper with one or more of the objects listed below:
- Enchanted Golden Apple – Former Mojang Studios logo
- Wither Skeleton Skull – Skeleton skull and crossbones
- Creeper Head – Creeper face
- Oxeye Daisy – Daisy
- Bricks – Brick pattern (Bedrock Edition)
- Vines – Vine pattern (Bedrock Edition)
The optional pattern components can be mixed and matched with the existing patterns to provide a variety of effects.
Obtaining Banners
Here are some options for getting banners in Minecraft:
If you’re using the Bedrock Edition, you can earn Illager banners by killing the Illager patrol or by looking through your creative inventory.
You can go to an End City and look for flags on the tops of the houses, which you can then break with an axe. When a block to which the banner is attached is removed, relocated, or destroyed, the banner breaks free.
A banner can also be exchanged for an item. Expert cartographer villagers, for example, frequently offer one or two blank banners for three emeralds. If you do something kind, such as stop a raid or heal a villager, you can also gain a discount.
Blank flags can be purchased from expert-level shepherds in the Bedrock Edition.
You can also obtain an ominous banner or an Illager banner by killing an Illager and collecting the banner.
Making a Shield First
If you’re playing on survival, combat is an unavoidable element of the game. There will come a point when you’ll be confronted with too many adversaries with too much range to deal with. In that situation, you must either take cover or fight, range as well as with a bow.
You could also employ the use of a shield. It’s one of the most underappreciated objects in Minecraft, yet its importance cannot be overstated. It can make a significant difference early on in a game of Normal or higher difficulty. We’re going to teach you all there is to know about shields, as well as how to make one.
The shields are used to defend against attacks. When the shield is equipped, keep the right click pressed to activate blocking. The player is then slowed down, and the shield absorbs the damage they have taken. In Minecraft, you may use signs to mark buildings and place directional signs. However, there is a variation that can be used as a shield in battles. So, in this essay, we’ll show you how to create a Minecraft shield.
It goes without saying that you will need to make a shield in order to survive in Minecraft. Of course, the shield will improve your defense system and make you more resilient, allowing you to endure blows for longer. We’ll walk you through the supplies and how to make a shield in this Minecraft Shield recipe tutorial.
Ingredients Required
In Minecraft, you’ll need 1 x Iron Ingot and 6 x any of the following Wooden Planks to make a Shield:
Dark Oak Planks
Crimson Planks
Warped Planks
Birch Planks
Jungle Planks
Acacia Planks
Oak Planks
Spruce Planks
Head to the crafting bench to construct Shield once you have all of the necessary supplies.
Steps to craft the shield
To make a shield in Minecraft, follow the steps below.
Step 1: Activate the crafting menu.
Step 2: Place the iron ingot in the first row’s second column.
Step 3: The wooden planks should be placed in the first and third columns of the first row, all of the columns of the second row, and the second column of the third row.
Essentially, it will go like this:
First row: wooden plank – iron ingot – wooden plank;
Second row: wooden plank – iron ingot – wooden plank;
Third row: Vacant – wooden plank – empty

The shield will appear on the right side of the crafting table once the ingot and planks have been properly positioned.
Step 4: Complete the crafting process and add the shield to your inventory.
That’s how a shield is made. The only thing you need to remember is to follow the exact pattern because, as you can see in the image above, you won’t be able to make the shield if you don’t. You can also create numerous shields to save for later. It is also possible to repair your shield if it has been damaged. In Minecraft, all you have to do to repair a shield is arrange two damaged shields on the crafting table. The outcome will be a whole new repaired shield with the combined durability of both damaged shields plus an additional 5.
Repairing Shield in Minecraft
Once you start using your shield, it will have a durability bar, just like most other objects in Minecraft. Put it in your left-hand slot and press M2 to utilize your shield to block any of the above-mentioned oncoming assaults. Over time, the bar will begin to deteriorate.
Your shield may swiftly deplete depending on the power of the strikes. You may either use an anvil to merge two slightly depleted shields for one fully repaired shield with a 5% durability increase, or you can use an anvil to mix it with planks and repair it that way.
If you want to repair your Shield after it has been damaged. There are two options for resolving the issue.
- An anvil is used to make repairs.
- To make an amended shield, combine two damaged shields on your crafting grid.
Enchanting Shields
We’ll go through three different ways to enchant your Shield and what each one does.
The following enchantments can be applied to your Minecraft Shield.
Mending: It uses XPs to repair your Shield.
Un-Breaking: It lengthens the life of your Shield.
Curse of Vanishing: When the player dies, the Curse of Vanishing removes the cursed Shield.
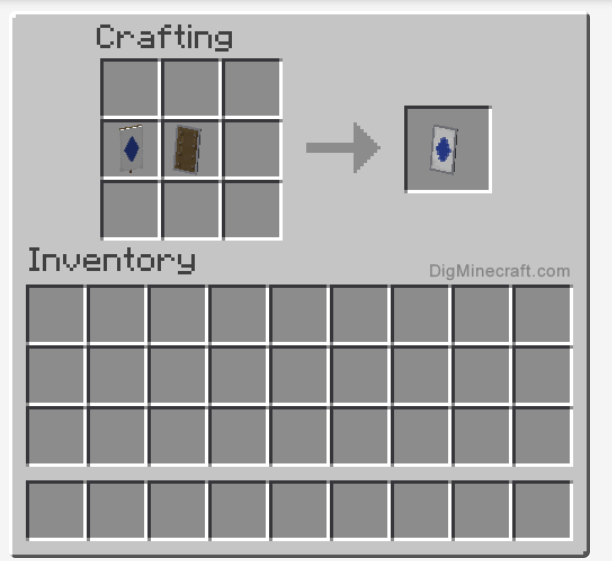
Customizing Shields with Banners
At first, your shield will appear to be nothing more than a plain wooden shield. While you can make minor tweaks to make it seem nicer, this will have no effect on how well it blocks harm or how long it lasts. Even if you’re playing Minecraft in Java Edition, you can still make minor cosmetic adjustments.
If you have a banner pattern in your inventory, you can use it to personalize a shield by combining it with the shield in a crafting grid. Any pattern can be applied to a shield, although due to the size of the shield, the patterns may not always appear true to their original appearance.
Limitations of a Shield in Minecraft
While the shield can achieve a lot, it has a few limitations when it comes to blocking. Any bow with the Piercing enchantment can damage you through your shield. Splash potions and dragon’s breath, as well as TNT damage you cause to yourself, will pass through your shield.
Vindicators are the worst enemies to shield against, as they may render your shield useless for up to 5 seconds after being struck. If you chance to run into one at a Woodland Mansion or during a raid, keep this in mind.
Also, Read More: Armour Recipes in Minecraft
Range of Shield
The shield can also stop a certain range of attacks. It will obviously block any harm that comes from in front of you, but anything that comes from behind you and horizontally on your side is sure to hit and hurt you, even if you’re shielding. Unless you specifically block for damage from above or below you, the same is true for damage from above or below you.
Fall damage cannot be negated with blocking, as should be obvious.